Friday, 18 September 2015

Talented Miniaturists

I have three customers this month who have won competitions with a little help from my lighting products.  One used red Nano LEDs in a magic trick to win the World Championships and another has won the Best Large Miniature in a Warhammer 40K competition in Norway using LED lights and a servo to turn the tank turret and then there's the miniaturist I'm going to feature in this blog post who has won 1st prize in the Hungarian Dolls House and Miniatures contest for her stunning Cape Cod Living room.

Orsi of Orsi's Miniatures is probably familiar name to many of you and has blown me away on numerous occasions with her stunning miniature creations.

I first worked with her to provide lighting for a recreation in miniature of Sherlock Homes's kitchen and since then we've worked on a few projects together but the latest is noteworthy in that it won her the 1st prize and a lovely trophy.  So without further ado I'll show you the pictures!


Orsi's Miniatures Cape Cod Living Room. 
Stunning isn't it!  

The overall lighting is provided by LED spotlights in the ceiling.  There is another LED in the table lamp and hanging lights, warm white nano LEDs light up the bookshelves and a flickering fire kit provides a realistic glow in the fireplace.

Orsi's Miniatures - Flickering Fire and Nano LEDs in the bookshelves
Orsi's Miniatures - Nano LEDs light up the bookshelves
The Nano LEDs are typically used for smaller scales but here you can see just how effective they can be in 1/12th scale for lighting up smaller areas like these bookshelves.  The Nano LEDs are just 1.5mm long but give off an incredible amount of light and with their tiny size they are easily concealed.

Orsi's Miniatures - Miniature or real??
The attention to detail throughout this wonderful miniature is testament to Orsi's skill and vision.  I am delighted that my lighting helped bring this room to life.

Jennifer, 

Sunday, 14 June 2015

Tutorial - Miniature Trees, Bushes & Topiary

Following on from my last tutorial on curved fencing (click here if you missed it) I am now going to look at making trees and bushes from Seamoss and topiary ball trees.  This tutorial is applicable to all scales if sizes are adapted to suit.

Seamoss Trees & Bushes


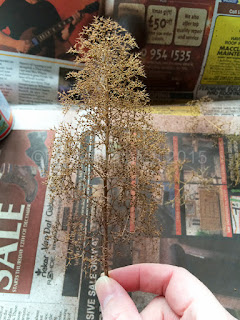
Seamoss Tree in 1/48th Scale


Seamoss is a natural plant material that is very useful for making trees in 1/48th or railways scales and also bushes in 1/48th, 1/24th. 1/12th scales.

It naturally forms branching structures so it's a bit easier to use than wire where you have to shape it yourself but is fairly fragile so care must be taken when handling.  If branches break off you can glue them back on with tacky glue or superglue.

Step 1:  Seamoss has little leaves on it which need to be gently removed with tweazers.  You can also remove or reattach any broken branches and shape as required.  Trimmings can be used for bushes and small plants.  If you want a thicker trunk you can add a bit of air dry clay or even pieces of masking tape to the lower truck before painting.

Seamoss with leaves removed and trimmings kept
Step 2:  Seamoss is naturally a yellow colour so it's best to first spray it brown with spray paint.  I have used a mid brown by Humbrol.

Spray painting the sea moss
Painted Seamoss Tree
Step 3: Add scatters.  I have chosen to use fine scatters in a mix of light and dark green.  The dark green is applied first and goes on the underside of the branches to add depth and shadow.  The light green goes on to the upper side and branch tips to show fresh growth.

First give a good coat of hairspray which enables the scatter to 'stick' to the seamoss.  Any cheap hairspray is fine or you can use artists matt spray sealer.

Sprinkle on the scatters.  I recommend doing this over a tub /container so you can keep the rest to reuse.

It's a good idea to use an old paintbrush to carefully remove scatter stuck to the truck or branches where it doesn't look natural.

Once you are happy spray the tree with spray adhesive and then another coat of hairspray to help the scatter stick.  Spray adhesive is quite good for seamoss because it's more fragile so doesn't risk breaking any branches etc.
The alternative is a mix of 4 parts water to 1 part PVA and a drop of washing up liquid in a clean garden or household sprayer but I find you struggle to get a fine enough mist for the seamoss.

If there's any bits where scatter hasn't stuck you can dip into PVA glue and apply scatter that way.

Leave to dry.  Once dry it should be pretty robust as the glue helps firm up the structure.


Tip: Seamoss can also be used for larger trees if you break down the pieces and use the smaller pieces as finer branches on a wire tree or other model tree framework.

Bushes:  Bushes are done in the same way but you can also use a brightly coloured scatter to suggest flowers.
In this example I've use a fine green scatter with yellow through it.

Seamoss Bush
Seamoss Bush

Seamoss Flowering Bushes
Materials Required:
Links provided where I sell the item

Seamoss
Scatters in dark and light green
Hairspray or artists matt sealer
Spray adhesive or PVA glue (thinned)
Tweezers
Brown matt spray paint


Topiary Ball Trees

Topiary ball trees can be made for any scale.  Just select the appropriate size polystyrene ball.  Here I've made 1/12th scale ones using 20mm balls (25mm would also be suitable) and 1/48th scale ones using 10mm balls.

1/12th Scale Topiary Ball Tree
Step1: Glue a cocktail stick into the hole of the polystyrene ball - leave loose for 1/48th scale as we will replace with wire at the end and leave to dry.

Step 2: Paint the polystyrene balls brown using acrylic paint.  I used DecoArt crafters acrylic in chocolate.  Leave to dry.
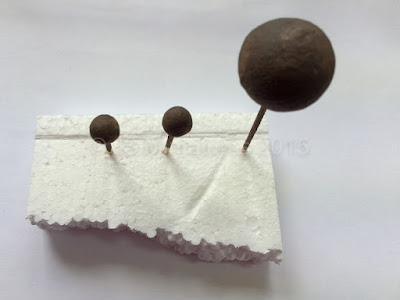
Polystyrene balls painted brown
Step 3: Spread PVA or tacky glue over the ball, trying to get as even as possible.  It can be thinned slightly if required but you don't want it running off!

1/12th scale ball with glue

1/48th scale ball with glue

Step 4: Mix together two tones of green scatter.  A dark and light green works nicely in a medium/course grade for 1/12th scale and a fine grade for 1/48th scale.

The dark green is the older growth and the light green represents the fresh growth.

Sprinkle over the glue covering all areas.  It's best not to touch the ball as the scatter will stick to your finger rather than press to the ball.  You can add more glue and scatter afterwards as required.

Mix of fine scatter for the 1/48th scale ball

Applying scatter to the 1/48th scale ball
Spray with hairspray to help hold the scatter and then leave to dry.  I find a bit of polystyrene is good to stick them into or you could use blue tack or similar.

You should end up with something like this:
1/48th Topiary Ball Tree - after scatter
Once dry you can add additional scatter with drops of glue in any bare patches.

For the 1/48th scale topiary ball trees I used some florists wire twisted together for the trunk.

1/48th Topiary Ball Trees

I still need to get a pot for each of these!

Materials Required:
Links provided where I sell the items

Polystyrene balls (I have these, just need to update the website so please ask if you'd like some)
Green scatters
PVA glue
Cocktail stick or paper covered florists wire
Brown acrylic paint
Hairspray or artists matt sealer


I hope you have enjoyed the tutorial and find it of use.  More tutorials coming soon.

Jennifer,


Friday, 15 May 2015

Tutorial - Curved Fencing

Following on from the launch of my landscaping materials last week I thought I'd do a quick tutorial on how easy it is to bend it to create curved fencing.

If you want to create that unique look not possible with standard plastic or wood fencing then this is the tutorial for you!

The wood pulp board used for the fencing is a very versatile and unique product.  It doesn't separate into layers like matt board or cardboard and comes in various thicknesses.  It's also suitable for laser cutting meaning it's easy to create intricate designs that don't break the bank.

One of the killer features of this board is it's ability to be curved and then retain that curve once dry.  I've already used it successfully on a previous collaboration with Quernus Crafts for Christmas.

Curved Fencing Example
So without further ado...

Tutorial:

Step 1:  Find a suitable sized container that has the right sized diameter for the curve you want to make.

Step 2:  Take your piece of fencing and using your fingers, dampen both sides with water.  It shouldn't be dripping, don't run it under the tap, just enough to dampen the surface.  Shake off any excess.

Step 3:  Starting at one end, carefully bend the fence around the container, working your way around and then hold in place with an elastic band.  I used the top off a ear bud tub that I use for holding paint etc.

Dampened fence curved round container and held with elastic band

Step 4:  Set aside and leave to dry.  Should only take an hour.

Step 5:  Take off the elastic band and you should have a curved fence.

Dry and curved fencing

Step 6:  Paint in the colour of your choice.  I used Decoart Crafters Acrylic and one coat of black was enough.  White may need 2 coats.  You can leave it natural or stain for a wood effect if you wish.

Painted curved Fence

Painted curved Fence

Step 7:  Glue in position using PVA glue.  Wood glue or tacky glue are best.  There is flexibility in the fence so you can tweak the curve a little if you need to.

Fence posts and a gate are provided so panels can be joined together at corners.

And that's it!  Simples!

Hope you enjoyed the tutorial,

Jennifer,


Friday, 8 May 2015

New arrivals... Landscaping Materials

I can't believe how quickly the months are flying by.  It's May already and summer is nearly here.  

With the onset of spring and the welcome fresh new growth after the winter I have been hard at work behind the scenes putting together my new range of landscaping materials specially selected for their suitability for 1/48th scale and smaller.  You can read about these below along with some 'How To' tips to help you get started.


Click here for : Landscaping Materials


New Landscaping Materials
Above is a photo showing a few of the new products along with one of my house base kits which are ideal for using along with the landscaping materials.


These specifically selected premium materials have been chosen for their suitability for use in 1/48th scale and are provided in handy packs to suit 1-2 projects depending on size.

I have designed my own set of laser cut fencing which are cut from a special wood pulp board which doesn't split at the edges but can be easily cut with a craft knife and painted with standard acrylic paint.  It also has a very unique property that allows the fencing to be bent to shape.  Just dampen the fence both sides and curve round an object and leave to dry.  Once dry it will hold the curve permanently and can then be glued to your layout.

Other materials include a range of scatters for trees, bushes, hedges, flowers, paths and sand for beach scenes.

Selection of ground materials for paths, earth and grass.
Hedges are pretty easy to make or you can choose our pre-made formal hedge.
Pre-made formal hedging

Trees
I have in stock two types of tree making materials.  For those who are more experienced you can buy a length of tree making wire which can be separated and twisted to form the shape of any style of tree you like.  The wire structure can either be simply sprayed brown with spray paint or covered with air dry clay or Milliput to form a thicker truck and branches and then painted.

The other option is a Seamoss tree which is a natural material which has a very realistic tree structure.  This can be used as is for a winter tree or scatters can be added to make a 'leafed' tree.  Simply spray with spray adhesive and dip or sprinkle the scatter over the top and leave to dry.  You can add blossom or fresh growth by dipping ends of branches in PVA glue and adding light green scatter for fresh growth or coloured scatters for blossom.

Seamoss can also be used in small piece for shrubs and bushes.  It is quite delicate as it is a natural material so should be handled gently.

Seamoss Tree only £1.75
Tree Making wire only £1.15


Hedges
I have two hedge materials in stock.  The first makes informal or formal hedges and uses rubberised coir as the base structure.  These are pre-cut and painted and ready for you to add your chosen scatter materials to.
The other hedges are formal hedges with a foam core.  These are pre-made and ready to go.

Hedge kit
Formal hedges


How to make a hedge:
The hedge kit comes with 4 pieces of pre-painted 'hedge', 6" long, 1" high and 1/2" wide, perfect for 1/48th scale.

Start by mixing up a scenic spray glue in a clean garden or household sprayer with 1 part PVA to 4 parts water and a drop of washing up liquid to help flow.  (Spray clean water through nozzle after each use)
Cover the hedge with your chosen scatter colour(s) and then spray throughly with the scenic glue.  
Spray with hairspray or artists fixative (use a ventilated area) and leave to dry for 24 hours.

You should then have a robust, flexible hedge which can be trimmed to make a formal hedge.
The rubberised coir can also be teased out before adding scatter to make a wild countryside type hedge.

Hedge pack of 4 just £4.99
Formal hedge pack of 6 just £5.25

Click here for : Landscaping Materials

Jennifer,