Saturday, 23 November 2013

Kit Review: 1/48th Christmas Market Stall

Most of you will know by now that I am specialising in lighting dolls houses and scale models with LEDs, especially smaller scale kits either for 1/48th & 1/144th dolls house kits or other smaller scale models.

Last week Jane Harrop asked me to design a kit for her new Christmas Continental Market Stall.  She wanted a warm white LED to be powered by a coin cell battery which would be hidden on the back of the stall.

I got a kit to make up so I could design and demonstrate the lighting and so in return I am reviewing the kit.

The kit was smaller than I imagined when I first thought of a market stall.  I think I'm still getting used to the concept of 1/48th scale being so small having worked in 1/12th scale for so long!

The kit came in a lovely brown envelope with a picture of the finished market stall on the front and I also had along with it a few small brown envelopes containing a selection of 'gifts' to sell in the stall including tiny Christmas trees, 3D trees, little houses and gingerbread houses.

On emptying the contents of the kit onto my workspace I had the following parts.  The shell of the market stall is etched with lines to emulate the wooden boards and all the pieces are precision cut on a laser cutter.  There wasn't much of a burnt smell with this kit as there can be with some and the edges were a nice rich brown rather than burnt black so no sanding was needed.
The market stall kit components
 The kit is comprehensive in it's contents.  You get everything you need including sandpaper.  The only items I had to provide was glue and wood stain.  You can stain, paint or leave the stall natural.  I chose to use some Light Oak stain I had which matched the colour of the edges of the wood nicely.

The instructions are very easy to follow and colour photos show the various stages so this kit is easy to assemble.  The sandpaper provided is called 'Abranet' and it's a bit of a revolution in sandpaper because it's full of holes so instead of the dust clogging the sandpaper and going all over your wood, it instead falls through the holes to the paper underneath leaving your wood basically dust free and you can wrap up and throw away the paper afterward.  Brilliant!
There's plenty of life left in the sandpaper afterwards for future projects too being of the new type which is long lasting.

After a quick sand of the pieces I used a bit of paper towel to apply my wood stain, giving a light coat as suggested in the instructions to prevent warping.  My kit was fine and you don't need much to add a nice colour to the wood.

Assembling the kit was pretty straightforward.  All the pieces fitted together well.  The only sanding required was to the door frame which was slightly long (as noted in the instructions).  For that I glued the wood pieces into the doorway and once dry, placed the door in position and used an emery board (nail file) to remove the excess wood from the bottom.  Just a few strokes and it was done.

The stained and assembled market stall kit
The assembled roof and shelves
If you are going to light the market stall there is an additional roof strut provided which has a hole in it for the LED and wire to fit through (see photo).

I tried hinging my stall shutter by using a bit of paper.  It was mostly successful but has a tendancy to not open fully, hiding some of the interior.

The sanding and fixing of the shutter was the only photo I found unclear as it looked like it was fixed at 90 degrees but the instructions suggested a chamfer was to be added and I wasn't sure why.

Once the market stall was assembled I made up the shelves.  There are 3 shelves for the walls and also a  table for the display of your Christmas goods.

I had to sand the ends of the table slightly so that it would fit inside the stall, again using an emery board to keep the end square.

The shelf brackets are tiny but spares are provided.


Some of the gifts to sell in your market stall
The final task was to make up the gifts for inside the stall.  The tiny houses were easy and I left them natural and just glued them onto the shelves.  The little trees are somewhat fiddly and a pair of tweezers is essential but with a little patience they're not that difficult to do.  I stained them while still in the wood piece and then put them together.

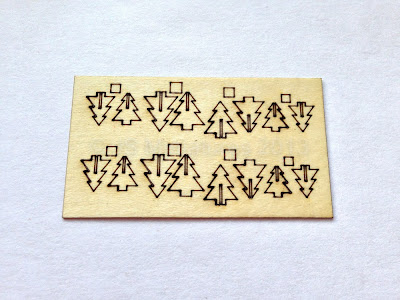
3D trees
3D trees
The 3D trees are delightful.  Such amazing detail given how small they are ( the photo makes them look bigger than they are and I should really have taken this with a ruler against them!).

Again, I stained them first and then popped them out one by one so the pieces didn't get mixed up and assembled them using tweezers.

The final step was to glue the decorations onto the shelves and table and then glue the shelves into the stall.  I did have to think about the arrangement as some of the single trees are quite tall and so don't really fit on the shelves so you need to pick and choose which you want to use.  I chose not to use the gingerbread houses as I was running short of time but these would fit on better.  The 3D trees are smaller and so they work well.

 It only took 2-3 hours to make and the light really does make such a difference.

So, here it is... the completed market stall with gifts and tiny nano LED light!

The completed market stall with gifts and light
The back of the stall showing my lighting kit containing coin cell battery holder and on/off switch.  I glued these on with superglue.  Just a couple of spots on the holder and one on the switch is enough.
The back of the stall with the battery and on/off switch

If you love the kit and wish to purchase one Jane has them on her website and will also have them at the York and Kensington fairs.

If you want to light the kit you can buy the lighting kit shown here from me by going to my website.

I hope you have enjoyed the review.

Jennifer,

Friday, 15 November 2013

Christmas is just around the corner....

Sorry for my absence the last couple of weeks.  It suddenly got very busy here and I was also away one weekend visiting my sister.

To put things back on track it'll probably be a bit of a bumper post!

As some of you may well have noticed I now have my Christmas products listed on my website.  To expand on last years range I have added 2 smaller sleighs so you can now buy one for most scales of dolls house ie 1/48th, 1/24th & 1/12th.  They are also very suitable just as a gift, table centerpiece or general Christmas decoration.

They are all available as laser cut kits which keeps the postage cost down and gives you a fun project for a winters evening!

First up is the tiny and very cute 1/48th scale set.  The sleigh is just 2" long and it all fits inside a small matchbox, including the instructions!  Who could resist such a delightful little package?

1/48th Reindeer & Sleigh laser cut Kit in matchbox
1/48th Kit inside a small matchbox
1/48th Reindeer & Sleigh laser cut Kit
1/48th Reindeer & Sleigh Kit
At only £4.99 it's the perfect gift for yourself or a friend.

Buy now!


Next up is the slightly larger 1/24th scale kit.  The sleigh is 4.5" long and the larger size allows for a bit more detail in the sleigh.
1/24th Reindeer & sleigh laser cut kit
1/24th Reindeer & sleigh kit

1/24th Reindeer  laser cut kit
1/24th Reindeer kit

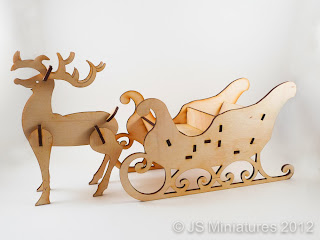
1/24th sleigh laser cut kit
1/24th sleigh kit
This set is only £8.99 for both sleigh and reindeer.

Buy now!

Finally we have the 1/12th scale sleigh and Rudolph which are available both as a complete set and individually.
1/12th Rudolph & Sleigh painted kit
1/12th Rudolph & Sleigh painted kit 
1/12th Rudolph & Sleigh laser cut kit
1/12th Rudolph & Sleigh kit 
This set is only £14.99 or you can also purchase the sleigh and Rudolph individually.
Sleigh only £12.99
Rudolph only £5.99


The last couple of days I've been busy packing up all the different kits into boxes in preparation for the Country Living fairs at Glasgow and Harrogate at the end of this month.

I'm not going personally but I have collaborated with Kirsten Miller of Quernus Crafts who bought some custom made painted sleighs and reindeer for her Santa mice and these will be for sale at the fairs.

She is also selling my kits at the fairs so it's a good opportunity to do your Christmas shopping if you're local to either of these events.

Country Living Fair Glasgow - 21st-24th November
Country Living Fair Harrogate - 28th-1st December

Until next time...

Jennifer,


Friday, 18 October 2013

A busy week

This week has flown by.  I suddenly realised this morning that it was Friday and I had a blog post to write.  At that point I had a bit of a panic.  What have I got to tell you about?  It's been one of those weeks where there's been lots going on but not necessarily things that you would find interesting.

So, I had a look at my blog list and discovered that an exciting publication is out.  A while back I blogged about providing LED lights for Orsi Skulteti for her recreation of 221b Baker Street from the Sherlock BBC TV series.  (Using LED Lights in a kitchen)  A while ago she contacted me to tell me she had been asked to write asn article about the making of her kitchen for the Spanish magazine "Miniaturas" and she asked if it would be ok to specify me as a supplier.  I quickly agreed.

According to her blog the magazine has now been published so if anyone gets the magazine you can look out for the article.
This is her blog post: Orsis Minis - Miniaturas article

Miniaturas Magazine
Miniaturas Magazine

Other than that I've been busy with orders and I have been preparing the sleighs and reindeer for Kirsten Miller or Quernus Crafts.

It looks like a small army!  Here they all are, glued up ready for painting.  The first coats of paint are on so I'm hoping to have these finished soon.

Reindeer & Sleighs for Quernus Crafts

I am planning to have these available for sale and also as a workshop at the brand new Wonders In Miniature online fair in November.

The fair will run from the 8th - 11th November and is all about holidays from around the world.

Keep a look out for updates soon!

Jennifer,


Friday, 11 October 2013

New Arrivals....

Hot off the laser cutter I am very excited to announce the arrival of my Christmas products for 2013.

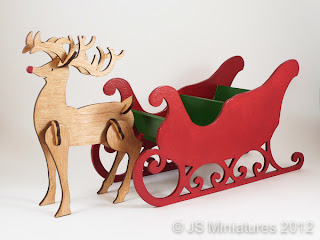
Last year you may have seen or bought my big sleigh and Rudolph models.  This year I have expanded this range and now have 3 smaller sets so you can buy one for 1/48th, 1/24th or 1/12th scale or they can just be a lovely ornament as part of your Christmas decorations.

The photo shows them just unpacked and assembled straight out of the box!

Sleigh & Reindeer laser cut kits
Laser cut kits - from left to right: 1/48th set, 3" Sleigh set, 1/24th set and 1/12th Sleigh with Rudolph at the back
I am also very excited to be working with the very talented Kirsten from Quernus Crafts on a collaboration for Christmas.  The 3" kit has been specially designed for a very special Santa!

Meet Santa mouse who is all ready to deliver his presents for Christmas.

My 3" sleigh & reindeer prototypes with Santa mouse by Kirsten

This was the prototype design so the keen eyed amongst you will notice that the reindeer now have 4 legs!  These sets will be available from Kirsten at the Country Living fairs in Glasgow and Harrogate at the end of November and also through her website leading up to Christmas.

Now the kits have arrived I just have to get 8 of them made up and painted for her.  Busy days ahead!

I'm still finalising the packaging but if you are interested in pre-ordering a kit then please comment or send me an e-mail.

Costs are as follows:
1/48th Scale Sleigh & reindeer @ £4.99
3" Long Sleigh & Reindeer @ £5.99
1/24th Scale Sleigh & Reindeer @ £8.99
1/12th Scale Sleigh & Reindeer @ £14.99

1/12th scale sleigh and Rudolph are also available separately:
1/12th scale Sleigh @ £12.99
1/12th scale Rudolph @ £5.99

I can also paint them for you.  Please inquire for costs.
1/12th Scale (8" long sleigh) & Rudolph assembled & painted


Best wishes,
Jennifer,


Friday, 4 October 2013

New products and updates

Following on from my tutorial last week about installing LED spotlights in a room box I have now added 3 new spotlight kits to my website to make it very easy for you to have a go!

These include a kit for a shop window or frontage with 2 LEDs, holders and battery kit, a 6 LED kit for a standard room box and a 10 LED kit for a large room box.  They are also suitable for a dolls house 1/12th scale room.
LED Spotlight Kits
LED Spotlight Kits
Kits include:
3mm High brightness LEDs (you can choose from warm white, white or blue for a witch or fairy room)
LED holders (choice of options)
3 volt AAA battery kit
Full instructions with photos (PDF)

Buy a shop window kit
Buy a standard room box kit
Buy a large room box kit

I have also updated my customer gallery.  If you are looking for inspiration it's well worth a look.  This week I added a photo from Barbara Adair who has bought several of my pre-wired flexible LED strips to light her shop boxes.  Here is her Scent Shop room box lit with 6 LED bright white strips.  They are nice and bright and a very affordable option.  All run off a 12v supply, usually a 12v regulated transformer.  They can be powered by a 9v battery but they are dimmer and the more strips you add the quicker the battery will run down.

LED strip lights in a scent shop room box by Barbara Adair

Another new section I have added to my website this week is for power supplies / transformers.
I have a regulated plug in transformer that will power from 1 to 50 LEDs and the voltage is adjustable so you can set it for use with 3v, 6v, 9v or 12v.  You can only use it on one voltage at a time but it does allow a bit of flexibility if you would rather use mains power rather than a battery to light your miniatures.
These are the modern type of digital transformer so they're small in size, efficient and quiet making it a good choice for your lighting.  They are also regulated meaning the power output won't spike making them perfect for powering delicate electronics like LEDs.

It comes with a selection of plugs, but for use with my LEDs you can purchase a 2.1mm socket to terminal block connector so you can fix the wires from the LEDs in one end and then simply plug it into the transformer plug.  Simples!

2.1mm Socket to Terminal Block Connector
3-12v Transformer
3-12v Transformer

 Visit the power supply page

Finally, I am hard at work on my christmas range and hope to have pictures and final details very soon. Watch this space!

Best wishes,
Jennifer,


Friday, 27 September 2013

Tutorial: Installing LED Spotlights in a room box


I have had a few inquiries about ceiling spotlights recently and one of my customers has successfully installed them in a modern art gallery shop box to display her miniature paintings so I thought it was the ideal opportunity to do a quick tutorial to show how easy and effective they are!

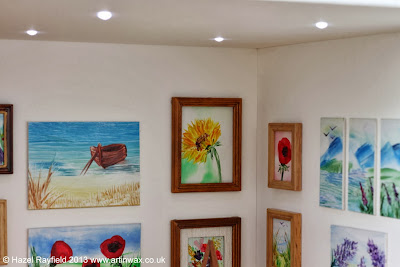
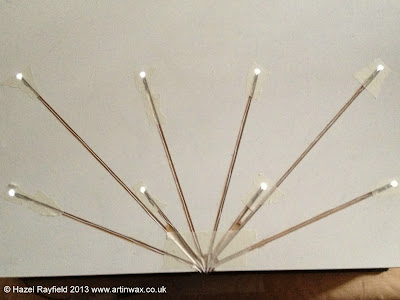
Firstly, this is the interior of Hazel's finished room box.  She wanted to create a modern art gallery that was well lit with even lighting which would show her paintings to best effect.

I suggested using 3mm high brightness LEDs with clear lens clips which hold the LED in place and also act as a diffuser, spreading the light and making it very even  (Standard round top LEDs normally produce a spotlight effect).

Finished art gallery with LED spotlights
Close up of LED spotlights
 Based on her requirements I did a couple of tests with a cardboard box of similar size to her room box and that gave a light spread of about 3 inches per LED meaning they can be spaced at 6 inch centers (150mm) to provide even lighting.
I drew up the plan below in CAD.  It shows the LEDs at 6 inch centers (150mm) and Hazel also wanted three additional LEDs for the shop windows and the front door.


CAD plan for layout of LED spotlights
For the clear lens clips the best way to install them is to mark out your layout on the exterior of your room or room box and then drill 4.5mm holes at each location.
Depending on your room or box you can either make grooves for the wires using a dremel, or by hand.  You can then secure the LED and wires in place with masking tape over the top or, if you don't want to make grooves you can just stick the wires down with masking tape and cover with your flooring or roof material the same as you would usually do with lighting wires.

The clips are designed for 3mm thick material but this can be worked around by drilling a slightly larger hole (ie 4.5mm) and if necessary, the clips can be glued in position with tacky wax or superglue or similar.  Just a tiny drop in the hole to secure.  I find the clear clips tend to hole pretty firmly though without glue.

Clear lens clips  - installed in a ceiling (demo)
Clear lens clips  - installed in a ceiling (demo)

Once the clear clips are in position you simply push the LED into the clip until you hear a 'click'.  It's best to have one finger on the 'spotlight' so the clip doesn't get pushed out of the hole.

Once you have positioned all the wires you should then have something like this:
External view of room box roof showing LED wiring in grooves
Once the LEDs and wiring are installed you can connect them up to your power supply.  In this case all the LEDs are powered off a 3 volt, 2 x AAA battery kit.  The 3 LEDs in the shop frontage were powered off a separate 2 x AAA battery kit so the front can be easily removed.  A small connector block was used to connect the LED wires to the battery wires.  It ensures a good connection and makes wiring very simple.  No soldering required.  This makes it a very effective but simple solution and ideal for portability.

This was a very large room box - the Victorian Shop Box kit from the Dolls House Builder which is 23" L x 16" W x 12" H (590 x 400 x 298mm) which is a huge shop!  The entire spotlight kit including 11 pre-wired LEDs, 11 clear lens clips and 2 AAA battery kits only cost £30 so it's a fairly cost effective solution.

The LEDs were wired with the white wire found in all dolls house lighting which has the advantage of being flat and so very neat to hide but it is slightly more expensive than the standard red & black wire I can also supply.

Other clip options include black ring clips or brass or nickel metal 3mm eyelets.  Top row shows each clip with a 3mm LED installed.  Lower row is the clips on their own.
Spotlight clip options

If you'd like to read more about the creation of Hazel's Art Gallery with lots of finished photos including the shop frontage, click on the link: Hazel Rayfields Art in Wax Blog.

I'd like to thank Hazel for allowing me to use the photos of her finished art gallery.

I hope it's a useful tutorial and perhaps inspires you to try something similar.

Jennifer,

If you would like to try your own spotlight ceiling you can purchase the 3mm LEDs, clear lens clips and batteries here:
3mm LEDs
Clear lens clips
3v Battery Kit


Friday, 20 September 2013

The dreaded 'T' word....

Yep, Tiding, also associated strongly with 'cleaning' and something not many of us are too keen on.

It's one of those rare things where it always seems to get much worse before it gets better.

Having gained the office as my workspace as mentioned in my post last week "A space of my own"  I have been gradually moving all my supplies and materials into the office in a bid to avoid the current situation where there's stuff everywhere!

I still have a long way to go but I made a start yesterday on my LED supplies.  I was looking for storage options and came across "Really Useful Boxes" and it turns out, they are really useful!

I bought a 5L XL organiser pack which came with a 5L XL box with lid and inside was 6 x 0.2L boxes and 3 x 0.3L boxes in their own compartment tray which can be used on it's own or stored inside the 5L XL box.  Nifty!

I chose the 5L XL box as it was perfect in size for my various packs of LEDs and resistors so I made some colour coded dividers and put them all in the one box.  Much easier than sorting through various bags and keeps them all together.

5L XL box for LED storage
LED storage
I used the other smaller boxes for other bits and bobs such as batteries, wire and switches.

I have another larger compartment tray with 16 x 0.3L boxes and plan to use those for some of my other dolls house miniature supplies such as clay, beads, etc etc.

I'm saving that for another day.....


Friday, 13 September 2013

Resistance is Futile!

Do you ever see a new miniature on a website or Facebook and think "I've got to buy that!"?  You then wrestle with your head v's heart asking questions such as...
1) What will I use it for?
2) What will (insert name of significant other) say when they find out?
3) What about all my other unfinished projects?
4) But it's only (insert cost)...

Your finger hovers over the "buy" button, perhaps even adding it to the cart and then changing your mind as you continue your silent dilemma.  You leave it for a while and find yourself going back for another look, maybe you even see another post about it on Facebook or Twitter teasing you while you try to make up your mind.

But we all know what happens in the end... don't we?!

You decide (insert name of significant other) won't mind once they see how amazing it is, how wonderful all the little tiny details are.  The question of "HOW MUCH??!" won't even be uttered.  You see the finished piece in your dolls house or miniature scene and you just have to have it.  There's probably even a few other things you add to the cart as it saves on postage right?  It's not that much money really....


.....So, what did I buy?

Well, it was only a small purchase..... it all started when I saw a post on Facebook by Miniatura Show showing the new kit available from Jane Harrop for Miniatura in a couple of weeks time.  I didn't think it would be available for sale yet but I went to her site and there it was, on the home page, calling to me....

Jane Harrop 1/48th Beach Hut Kit
1/48th Scale Beach Hut Kit by Jane Harrop

I almost bought it instantly... but then the questions started and I hesitated. The next day, there it was again and by that time it had evolved into a seaside scene in my mind and I couldn't resist.
I have a new found love of the smaller scales.  They are a bit fiddly but you can finish your purchase in a few hours or at most a weekend or two, so the satisfaction of completion is a great reward and they're relatively cheap by 1/12th scale standards.

Now all I have to do is find time to make it....

Like I said....

.....Resistance is Futile!


1/48th scale Beach Hut by Jane Harrop


Tuesday, 10 September 2013

A space of my own...

A couple of years ago we turned our box room into an office come storeroom and up until now it's been used by my fiancé as his office while he's been working from home.  That has meant that I've been using various parts of the rest of the house for my JS Miniatures tools and materials, but mostly the dining room table has been my workspace.  Obviously this isn't ideal as I have stuff everywhere in various cupboards or lying about.  I'm sure there are a few of you who know exactly what I'm talking about!

With plans to redecorate the living/dining room this year we have swapped rooms so I have the office as my workroom. Finally I have a space I can call my own and it's pretty ideal.  A nice big window, plenty of natural light and ventilation and storage space for all my supplies.
I'm sure it'll help me be more organised too.

So hear it is:
My workspace
My workspace
Pretty tidy at the moment - the tricky part is keeping it that way!

*cough* ok, so the photo was taken before I started working in it and I confess, it's already not as tidy... but I'm trying... honest! :)


Thursday, 29 August 2013

I need YOU....

....to give me your feedback!

Last week I mentioned starting up some online workshops to teach you how to use LEDs for your dolls house projects or other model projects.

The first workshops will cover aspects of lighting a dolls house such as a "Beginners guide to LEDs" and making a table or floor lamp.  These have been very popular workshops when I've done them live.

I've had 1 reply so far to my questions but I really need a few more so I can tailor the workshops to what you really want!

It'll only take 5 mins... honest :)

  1. Would you prefer step by step instructions in PDF form, a video demonstration or both?
  2. Would you like a set time to complete the task or to do it at your own leisure? 
  3. Would you like to chat with me to ask questions and get feedback?
  4. If I set up a closed Facebook group to enable you to ask questions and show your finished items would this be of interest?
  5. Or would you prefer a Yahoo group? 
  6. Are there any topics you would specifically like covered in a future workshop?
  7. Any other comments?
To provide your feedback please E-mail me or leave your comments below.

jsminiatures[at]gmail.com (please replace [at] with @)


Jennifer,


Friday, 23 August 2013

August in a nutshell

We had delivery of a couple of additional house guests last night.  As I have sorted out my e-mails and packaged up an order I have been followed by a pair of beady black eyes.  Apparently, the novelty of a printer and natural curiosity has got the better of my companion and it's been too much excitement to allow the usual daytime sleeping.

Now I have peaked your interest I'm sure you'd like to know who the house guests are?

Well, they are called Cinder & Treacle and they are a pair of female chinchillas that we are looking after for friends for a couple of weeks.  We have a pair of male chinchillas ourselves but they are kept in our spare bedroom so Cinder & Treacle are staying in our living room.

Treacle now seems to have lost interest and has decided that sleeping IS the best way to spend the day so I will continue my post...

July was a very busy month for me and so August has been a little about catching up with some of the back end stuff that often gets put off and deciding what the next new adventure should be for my business.

As a bit of a recap I launched a new website www.smallscalelights.co.uk at the start of August, dedicated to my LED lighting range and have been adding new products to that during the month.

I have had some interesting sales this month including selling some of my nano chip LEDs to a chap making a model of the Enterprise from the new Star Trek movies, some amber and warm white flickering LEDs for a diorama and some of my 3mm LEDs with clear lens clips are being used for spotlights in a modern art gallery room box.  Hopefully I will have some photos for my customer gallery when these are all completed.

At the start of July I took some workshops at the Stafford Making Day and I have received a couple of photos of my workshops which I thought you might like to see.  I'm the one in front of the window.

Stafford Makers Day Workshops - Beginners Guide to LEDs

Stafford Makers Day Workshops - Making a table lamp
I had a lot of positive feedback from my workshops and I would like to offer these to everyone.

I already do Online workshops through the Minis4All Yahoo group and with the technology available to us today it's very easy to communicate and there are lots of ways that information can be provided making online workshops a popular alternative.

This is where you come in! I would like you to help me develop these workshops by telling me what would work best for you. I would like to tailor my workshops to fit your needs so if you can take 5-10 mins to answer a few questions I would be very grateful.

  1. Would you prefer step by step instructions in PDF form, a video demonstration or both?
  2. Would you like a set time to complete the task or to do it at your own leisure? 
  3. Would you like to chat with me to ask questions and get feedback?
  4. If I set up a closed Facebook group to enable you to ask questions and show your finished items would this be of interest?
  5. Or would you prefer a Yahoo group? 
  6. For a workshop lasting about 1-1.5 hours would you consider £10-20 to be reasonable? (Cost will be determined by price of the kit and associated additional material such as a booklet)
  7. Any other comments?
To provide your feedback please E-mail me or leave your comments below.

Your feedback is important to me so thank you for taking the time to comment.

Jennifer,
Friday, 16 August 2013

Table Lamps at the Online Show

I have made some new lamps for the online show that's on until Tuesday 20th August.  This weekend is the ideal time to take a look if you haven't already.

These are all a traditional shape but there is a range of colours and options of base and lampshade available to suit you.

They come with a 3mm wide angle LED which gives a nice even light and is nice and bright.

There is a choice of wooden base in an Oak Stain, a range of cotton wrapped bases and also pink and green bases with a glittery finish.   You can also choose your colour of lampshade.

You can find them either at my table at the online show or on my website.


Oak Table Lamp

Green Table Lamp

Sky Blue & Violet Lamp

Cotton Base Colours

Friday, 9 August 2013

Online Miniature Show - 14th - 20th August 2013

If you fancy visiting a dolls house fair from the comfort of your living room then this is the fair for you!

Shelly Norris has been running these online fairs, twice a year for a few years now and I've been taking part for the last couple of years.

Each Artisan has a table which is a page where they can display their products with only hand crafted or embellished miniatures allowed.

Shelly has improved the site at each fair so it's now a lot easier to find the tables you want.  There will be a show pamphlet available with a list of all the artisan's tables and a short description of what they sell.

There have been some problems in the past with specific Artisans being difficult to find but this has been acted upon and tables will be listed by scale to make it easier for you to find the products of most interest to you.

There will be Artisans from all over the world and all will be high quality pieces so it's well worth a look.

The show is open from the 14th - 20th August.


A Mini Miniature Show


Hope to see you there!

Jennifer,


Wednesday, 7 August 2013

Dolls House Fabric - Now in Stock

I have some very pretty fabric in stock from the US which has been designed by a friend and fellow artisan.

She has some gorgeous and unique nursery sets but has also recently expanded her range and I now have in stock some beautiful roses fabric with a cream background that is available in both 100% cotton and a cotton & silk mix which drapes beautifully.  These would be perfect for curtains, bedlinen or upholstery.

There is also one 1/24th scale quilt & pillow kit available with an Under the Sea nursery theme.
Under the Sea Kit in 1/24th Scale
1/24th Scale Under the Sea Quilt & Pillow Kit

Please note these are all fabric kits for you to make up yourself.  The made up photos are to give you a better idea of what they look like.

Fabric Kits at JS Miniatures

Bug Buddies kit
Bug Buddies Quilt & Pillow Kit
Roses cotton fabric
Roses Cotton Fabric - made into duvet & Pillows

Friday, 2 August 2013

New Small Scale Lights Website Launched!

I have been working hard behind the scenes for a few weeks now to bring you a brand new website dedicated to LED lighting for dolls houses and the broader world of model makers.

The intention of the new site was to focus entirely on LED products which are specifically chosen to be perfect for a range of model making hobbies, from dolls house projects to model trains and boats.

I have expanded the available products so if you want to do your own soldering you can buy the LEDs and wire separately.

It's designed to be easier to navigate if all you want are pre-wired LEDs or other associated products without having the other dolls house products on the website.

I will be adding more products and content over the coming weeks so it's worth keeping an eye on the website or this blog for updates if it's something you're interested in.

Pre-wired Nano chip LEDs
Pre-wired Nano Chip LEDs
You can visit my new website here: Small Scale Lights

I hope you like the new site and bookmark it for future use.  Comments welcome :)

Jennifer, 

Monday, 29 July 2013

How to use LEDs in a kitchen

A few weeks ago I was asked about using LEDs for a 1/12th scale kitchen room box scene.

Orsi from Orsis Miniatures wanted LEDs for tube lights in the ceiling and under the kitchen cabinets, false daylight in a window and lights in a fridge.

LEDs are very useful in a kitchen and there's a few ways they can be used.  The photos below show some options. 
Other options for ceiling lights would be to use standard 3mm LEDs as ceiling spot lights or down lights with either clear lens clips or metal eyelets as holders.  You could also have a hanging 3mm LED with a lampshade.

Nano chip LEDs can be used in any appliance from a microwave to an oven.  Because they are so small but very bright they are the perfect way to bright your appliance to life without it being obvious you have installed a bulb or it getting in the way.

All the LEDs can be run off a 3v compact AAA battery holder.

I advised on colours and types of LED for each light, creating a bespoke solution with thin wires so she could fit the LEDs through the thin brass tubes for the ceiling lights.  Orsi recently sent me photos of her finished scene.  As it turns out, it was a commission to make a recreation of the kitchen from the BBC TV series "Sherlock" and I'm sure you'll agree that the detail is stunning.

General view of kitchen and lights

3mm white, wide angle LEDs in tube lights and warm white in false window

Close up of tube lights and warm white nano chip LEDs in fridge

Fridge lights switched off

Fridge lights switched on - warm white nano chip LEDs
If you would like to create some similar effects in your own kitchen you can either e-mail me to discuss options or you can buy the LEDs on my website.
3mm wide angle LEDs
Nano chip LEDs
3mm standard LEDs for spot lights / down lights
AAA battery kit

You can see more of Orsi's kitchen with lots of detailed photos on her blog:
Part 1
Part 2


Monday, 27 May 2013

New Website Design

For the past month I have been working hard on a new design for my website and shop.

The old site worked ok when I just had a few products but it was getting quite hard to navigate and starting to look a bit behind the times so I have produced a cleaner and easy to navigate site with better functionality.

I have improved some of the categories so products should be easier to find and generally made it simpler to use.

To give you a flavour of the site this is one of the slide show images on the homepage.

Check out the new site using the link below and let me know what you think.

JS Miniatures


Sunday, 5 May 2013

The first egg.....

The other day I wasn't sure if there was an egg or not, having not been sure what it would look like on the B&W camera, but today, I switched it on to have a look and it's very obvious now that the first egg has been laid.

The nest looks much more organised now too with a definite 'cup' with the egg in the middle and less of the scattered feathers that we saw a couple of days ago.


The first egg

Looking forward to seeing how many she will lay.

Jennifer, 

Thursday, 2 May 2013

Blue Tit Nest Update

The Blue Tits have been busy and looks like the nest is finished.  We're waiting for the first egg and it's a bit hard to tell whether it could have been laid or not.

This was the view on the 30th April with the nest looking finished and lots of feathers having been brought in.


Nest 30-4-13

Last night I switched on the camera at about 9pm and was amazed to see the female Blue Tit sitting on the nest.  I wasn't sure why she was there as there's no eggs yet but on doing a bit of Googling today I've discovered that the female Blue Tit roosts in the nest box when the nest is finished!

I've discovered so many things I didn't know about these familiar garden birds, it's brilliant!

Female Blue Tit roosting - 1-5-13
The final photo for this post shows the nest this evening.  There is a very bright white spot that wasn't there before but it's a bit hard to tell whether this is the first egg or not.  Kind of wish we had a colour camera!

Is the very bright spot.....

an egg???

We'll have to wait and see if we get more of them.  Apparently they can also cover the eggs when they're not on the nest.

Keep checking for more updates!

Jennifer,