Following on from my last tutorial on curved fencing (
click here if you missed it) I am now going to look at making trees and bushes from Seamoss and topiary ball trees. This tutorial is applicable to all scales if sizes are adapted to suit.
Seamoss Trees & Bushes
 |
| Seamoss Tree in 1/48th Scale |
Seamoss is a natural plant material that is very useful for making trees in 1/48th or railways scales and also bushes in 1/48th, 1/24th. 1/12th scales.
It naturally forms branching structures so it's a bit easier to use than wire where you have to shape it yourself but is fairly fragile so care must be taken when handling. If branches break off you can glue them back on with tacky glue or superglue.
Step 1: Seamoss has little leaves on it which need to be gently removed with tweazers. You can also remove or reattach any broken branches and shape as required. Trimmings can be used for bushes and small plants. If you want a thicker trunk you can add a bit of air dry clay or even pieces of masking tape to the lower truck before painting.
 |
| Seamoss with leaves removed and trimmings kept |
Step 2: Seamoss is naturally a yellow colour so it's best to first spray it brown with spray paint. I have used a mid brown by Humbrol.
 |
| Spray painting the sea moss |
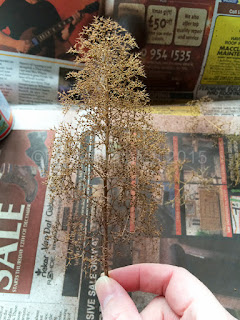 |
| Painted Seamoss Tree |
Step 3: Add scatters. I have chosen to use fine scatters in a mix of light and dark green. The dark green is applied first and goes on the underside of the branches to add depth and shadow. The light green goes on to the upper side and branch tips to show fresh growth.
First give a good coat of hairspray which enables the scatter to 'stick' to the seamoss. Any cheap hairspray is fine or you can use artists matt spray sealer.
Sprinkle on the scatters. I recommend doing this over a tub /container so you can keep the rest to reuse.
It's a good idea to use an old paintbrush to carefully remove scatter stuck to the truck or branches where it doesn't look natural.
Once you are happy spray the tree with spray adhesive and then another coat of hairspray to help the scatter stick. Spray adhesive is quite good for seamoss because it's more fragile so doesn't risk breaking any branches etc.
The alternative is a mix of 4 parts water to 1 part PVA and a drop of washing up liquid in a clean garden or household sprayer but I find you struggle to get a fine enough mist for the seamoss.
If there's any bits where scatter hasn't stuck you can dip into PVA glue and apply scatter that way.
Leave to dry. Once dry it should be pretty robust as the glue helps firm up the structure.
Tip: Seamoss can also be used for larger trees if you break down the pieces and use the smaller pieces as finer branches on a wire tree or other model tree framework.
Bushes: Bushes are done in the same way but you can also use a brightly coloured scatter to suggest flowers.
In this example I've use a fine green scatter with yellow through it.
 |
| Seamoss Bush |
 |
| Seamoss Flowering Bushes |
Materials Required:
Links provided where I sell the item
Seamoss
Scatters in dark and light green
Hairspray or artists matt sealer
Spray adhesive or PVA glue (thinned)
Tweezers
Brown matt spray paint
Topiary Ball Trees
Topiary ball trees can be made for any scale. Just select the appropriate size polystyrene ball. Here I've made 1/12th scale ones using 20mm balls (25mm would also be suitable) and 1/48th scale ones using 10mm balls.
 |
| 1/12th Scale Topiary Ball Tree |
Step1: Glue a cocktail stick into the hole of the polystyrene ball - leave loose for 1/48th scale as we will replace with wire at the end and leave to dry.
Step 2: Paint the polystyrene balls brown using acrylic paint. I used DecoArt crafters acrylic in chocolate. Leave to dry.
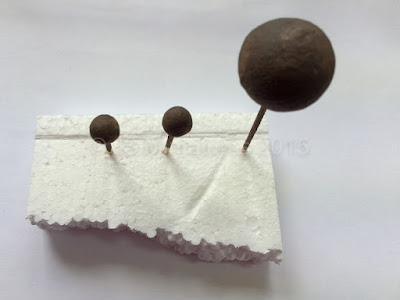 |
| Polystyrene balls painted brown |
Step 3: Spread PVA or tacky glue over the ball, trying to get as even as possible. It can be thinned slightly if required but you don't want it running off!
 |
| 1/12th scale ball with glue |
 |
| 1/48th scale ball with glue |
Step 4: Mix together two tones of green scatter. A dark and light green works nicely in a medium/course grade for 1/12th scale and a fine grade for 1/48th scale.
The dark green is the older growth and the light green represents the fresh growth.
Sprinkle over the glue covering all areas. It's best not to touch the ball as the scatter will stick to your finger rather than press to the ball. You can add more glue and scatter afterwards as required.
 |
| Mix of fine scatter for the 1/48th scale ball |
 |
| Applying scatter to the 1/48th scale ball |
Spray with hairspray to help hold the scatter and then leave to dry. I find a bit of polystyrene is good to stick them into or you could use blue tack or similar.
You should end up with something like this:
 |
| 1/48th Topiary Ball Tree - after scatter |
Once dry you can add additional scatter with drops of glue in any bare patches.
For the 1/48th scale topiary ball trees I used some florists wire twisted together for the trunk.
 |
| 1/48th Topiary Ball Trees |
I still need to get a pot for each of these!
Materials Required:
Links provided where I sell the items
Polystyrene balls (I have these, just need to update the website so please ask if you'd like some)
Green scatters
PVA glue
Cocktail stick or paper covered florists wire
Brown acrylic paint
Hairspray or artists matt sealer
I hope you have enjoyed the tutorial and find it of use. More tutorials coming soon.
Jennifer,


